DIY无人机的想法早在2012年的时候就有了,当时看了《三傻大闹宝莱坞》,主人公自己做了无人机。在这几年间一直看论坛,膜拜各路大神。直到2019年8月才付诸于实践。但是过程也是艰辛,也怪自己急于求成,基础不牢。
下面是四轴无人机的规划:
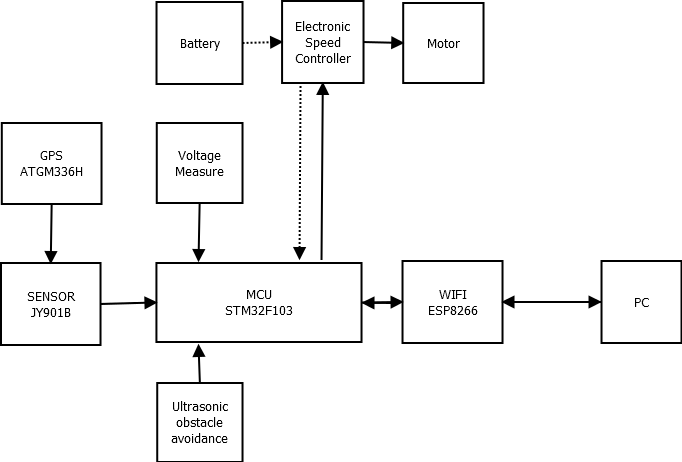
机架:DJI F450
桨叶:1045
电调:simonk30A
电机:1000KV
电池:4000mAh 3s 30C LIPO
WiFi模块:ESP8266 NodeMCU (ESP-12E)
超声波测距模块:HC-SR04
图传:暂无
遥控:暂无
没有买遥控器有几个原因:第一,会额外增加开销;第二,想用WiFi模块代替遥控器。用WiFi模块虽然不能够做复杂的飞行动作,但是可以把更多的数据参数传到PC端,方便开发调试。
总的规划有了,材料也买齐了,接下来逐个攻破。?
首先,要解决通信问题,能够看到参数才能更好的调试。
通信模块涉及到的模块如下所示:
通信模块功能:MCU将传感器数据通过WIFI模块传递给PC端,以及PC端发送指令给MCU。

实现步骤:
1.调通WiFi模块与PC端通信。通过传输静态数据来测试,实现收发信息的功能。
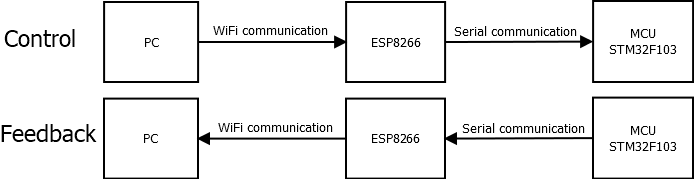
- PC端通过串口连接ESP8266,模拟MCU串口通信;
- 同时,PC端通过无线网卡与ESP8266连接,进行WiFi通信;
- ESP8266 设置为AP模式,服务器,UDP协议
需要编写C#上位机程序,和ESP8266的程序。上位机程序可以暂时使用其他工具软件代替:ESP8266调试工具V2.3.exe
2020/05/07 以上
lua开发8266API手册:https://nodemcu.readthedocs.io/en/master/
ESP8266学习之路 十 (UDP服务器通信):https://blog.csdn.net/dianzishi123/java/article/details/82685996
ESP8266 nodeMCU lua视频教程:https://www.bilibili.com/video/BV1CW41137dh/
ESP8266 NodeMCU 上的lua程序:
wifi.setmode(wifi.SOFTAP)
cfg={}
cfg.ssid="nodeMCU"
cfg.pwd="12345678"
wifi.ap.config(cfg)
sv=net.createServer(net.TCP, 3600)
sv:listen(80,function(pc)
  pc:on("receive", function(pc, pc2mcu_msg)
    print(pc2mcu_msg)
    pc:send("send success")
  end)
  pc:send("connect success")
  uart.on("data",function(mcu2pc)
    pc:send(mcu2pc)
  end, 0)
end)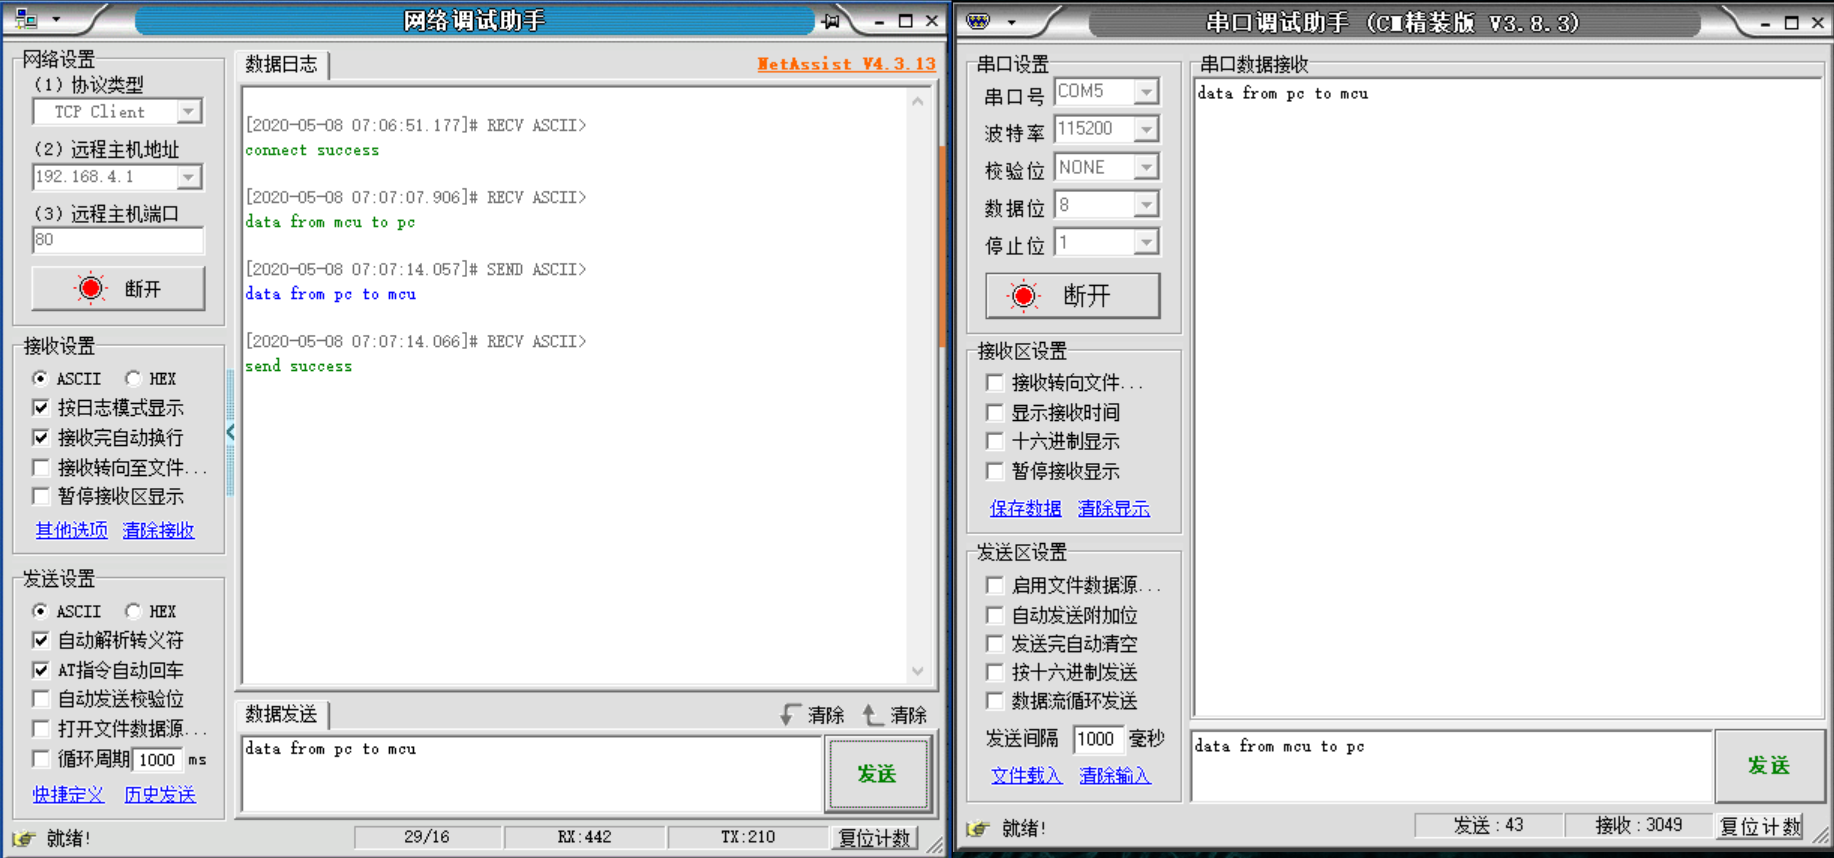
2020/08/02 以下
经过实验,感觉TCP通信实时性不够,改用UDP通信
#include <ESP8266WiFi.h>
#include <WiFiUdp.h>
//*** Soft Ap variables ***
const char* ssid = "nodeMCU_UDP";
const char* password = "12345678";
IPAddress APlocal_IP(192, 168, 4, 1);
IPAddress APgateway(192, 168, 4, 1);
IPAddress APsubnet(255, 255, 255, 0);
// Web Server
WiFiUDP Udp;
unsigned int localUdpPort = 80;
char incomingPacket[255];
int packetSize=0;
int len=0;
char uartPacket[255];
int uart_i=0;
char replyPacket[] = "send success";
void setup() {
// put your setup code here, to run once:
Serial.begin(115200);
pinMode(14, OUTPUT);
digitalWrite(14, HIGH);
WiFi.mode(WIFI_AP);
WiFi.softAPConfig(APlocal_IP, APgateway, APsubnet);
WiFi.softAP(ssid,password);
Udp.begin(localUdpPort);
}
void loop() {
// put your main code here, to run repeatedly:
packetSize = Udp.parsePacket();
if (packetSize)
{
len = Udp.read(incomingPacket, 255);
if (len > 0)
{
incomingPacket[len] = 0;
}
Serial.printf("%s", incomingPacket);
Udp.beginPacket(Udp.remoteIP(), Udp.remotePort());
Udp.println(replyPacket);
Udp.endPacket();
}
if(Serial.available()>0) //Checks is there any data in buffer
{
delay(10);
len = Serial.available();
for(uart_i =0;uart_i&lt;len;uart_i++)
{
uartPacket[uart_i]=Serial.read();
}
Udp.beginPacket(Udp.remoteIP(), Udp.remotePort());
Udp.print(String(uartPacket));
Udp.print(",voltage=");
Udp.println(analogRead(A0)*0.0123);
Udp.endPacket();
}
}调试飞机PID时,有好几次发生意外。为了安全起见,还是买了遥控器。